In this post…
Background
Pelago is a web design and development agency in Santa Barbara, California. Since our humble beginnings in August of 2000, we’ve seen the Internet landscape evolve exponentially in the last nine years. Our most current challenge as a creative and engineering agency is in embracing diversity in platforms and the inevitable shift towards the remote office. We use three different operating systems — Windows, OS X and Linux — on a daily basis. In addition to developing web-based project management software that is compatible with all three platforms, our designers and developers rely on them inside and outside of the office. Tunneling through the firewall from outside the office was our next requirement for embracing a diverse and distributed remote office.
Our SonicWall router makes it easy enough to establish a VPN connection using Windows. There is a client that can be downloaded from the SonicWall web site. What about other operating systems? Our developers often use Ubuntu Linux from home and required a way to VPN into the office. Once established, a VPN connection allows access to development servers, remote desktops, and other network resources inside the firewall; so you can see why it would be essential for the remote office.
The problem, as most Linux users out there already know, is that setting up a VPN connection in Ubuntu Linux is not very easy. After much trial and error, here is how we got the VPN working on Ubuntu Linux using Openswan.
Configuring the SonicWall Router
Login to your SonicWall router admin and make the following adjustments to the VPN settings.
-
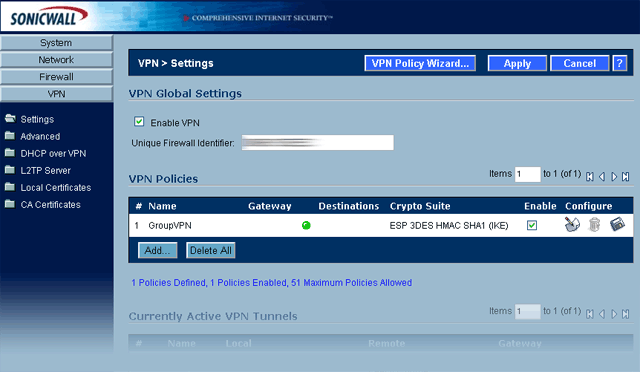
Click on the VPN link and note the Unique Firewall Identifier for your SonicWall router. You will need it later for the value.
sonicwall.unique.identifier

- Under VPN Policies, create or edit the ‘GroupVPN’ policy.
- Click on the General tab and set the following:

- IPSec Keying Mode: IKE using Preshared Secret
- Shared Secret: shared.secret.key (enter your secret key here)
-
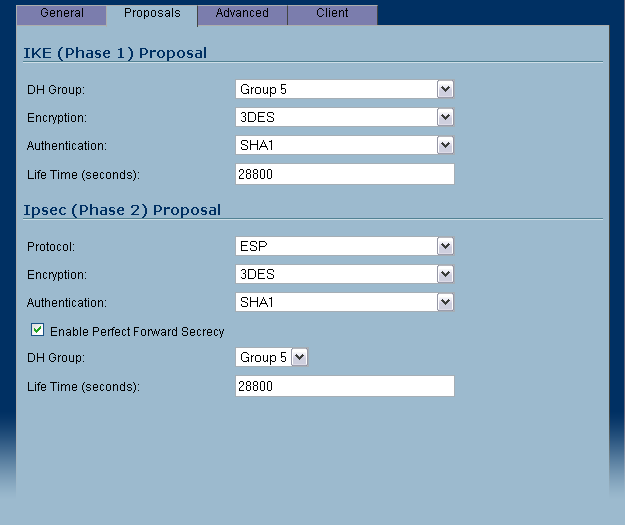
Click on the Proposals tab and set the following:

- IKE (Phase 1) Proposal
DH Group: Group 5
Encryption: 3DES
Authentication: SHA1 - Ipsec (Phase 2) Proposal
Protocol: ESP
Encryption: 3DES
Authentication: SHA1 - Enable Perfect Forward Secrecy (checked)
DH Group: Group 5
- IKE (Phase 1) Proposal
Installing Openswan
If you are using Ubuntu, open a terminal window and type in:
sudo apt-get install openswan
The install will ask you a few questions about how you want to set it up. Select the suggested default for each step. This will install Openswan and create the ipsec.conf and ipsec.secrets configuration files.
Configuring Openswan
Add the following connection parameters to your /etc/ipsec.conf file:
conn sonicwall

     type=tunnel

     left=192.168.2.31 #your IP

     leftid=@GroupVPN

     leftxauthclient=yes

     right=xxx.xxx.xxx.xxx #IP address of your sonicwall router

     rightsubnet=192.168.1.0/24 #gateway IP for your LAN. This will work for most

     rightxauthserver=yes

     rightid=@sonicwall.unique.identifier

     keyingtries=0

     pfs=yes

     aggrmode=yes

     auto=add

     auth=esp

     esp=3DES-SHA1

     ike=3DES-SHA1

     authby=secret

     #xauth=yes
Update: After upgrading to Ubuntu 9.10 a few things changed in the conf file. First, I had to comment out ‘xauth=yes’ as it was throwing an error.
Add the following line to your /etc/ipsec.secrets file
@GroupVPN @sonicwall.unique.identifer : PSK "shared.secret.key"
Starting and stopping the VPN connection
Starting ipsec and opening the VPN connection
sudo ipsec setup ––start

sudo ipsec auto ––add sonicwall (note: if you change the configuration files, you'll need to run 'sudo ipsec auto ––replace sonicwall' to reload the file)

sudo ipsec whack ––name sonicwall ––initiate
Closing the VPN connection and stopping ipsec
sudo ipsec whack ––name sonicwall ––terminate

sudo ipsec setup ––stop
References
The following links were useful for getting the VPN connection up and running on Ubuntu Linux:
Openswan wiki page for SonicWall routers:
http://wiki.openswan.org/index.php/Openswan/SonicWall
SonicWall PDF instructions for using Agressive Mode and IKE with Pre-shared Keys
http://www.sonicwall.com/downloads
11/05/2010 Update:
We are now on our third SonicWall Router. The original 170 didn’t have enough features for us. It’s replacement, the 2040 recently went belly up. We are now running on the 2400. When we made the upgrade the Linux VPN stopped working. Checking the logs on the 2400 revealed a message stating the IDs did not match during Phase 1 IKE. It took some googling to figure out but the fix was to change the leftid so that it matched the name of the security policy. In this case, GroupVPN:
leftid=@GroupVPN
Another update you can make to the above configuration is to add the following lines to your configuration to allow VPN access from any IP:
Add interfaces
config setup

     interfaces=%defaultroute
conn sonicwall
left=%defaultroute